Effective
Use of Product Filters
Magnet Commerce Product Filters:
It is a well known fact that e-commerce store
visitors are discouraged from buying online when they have
to browse in many different categories and sub-categories
of an e-store in order to find what they are looking for.
To overcome this problem Magnet Commerce comes with a powerful
filtering technology, similar to Amazon's, eBay's, Yahoo's,
Froogle's and MSN's, to help your visitors quickly find exactly
what they want. Your customers will be able to reach the products
that meet their demands by placing a specific query based
on the filters you will have defined for your product search.
Product filters can vary depending on the sort
of products you provide on your e-store. For example, if you
are selling TVs, your filter specifications could be any of
the following: "Manufacturer", "TV price",
"Diagonal screen size" and more. This way a customer
that is looking for a Sony TV set in the price range of $2000-$5000
can get all the possible choices immediately.
Front end - Use of filters on your storefront:
In order to show the use of filters on the storefront,
we will assume that you have added a "TV & Video"
category on your e-store and you are using the following filters
for your products: "Manufacturer", "TV price",
"Diagonal screen size". This will result in the
following list of filters appearing on the "TV &
Video" category page of your front end:
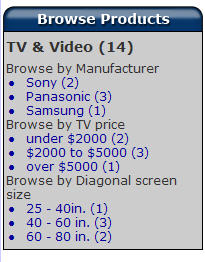
| Figure:
e-store front end: The list of filters defined for the
"TV & Video" category appears on the category's
page. |
When a customer chooses to see all the
products under $2000, the "TV price" filter disappears
from the previous list and only the products costing less
than $2000 remain available.
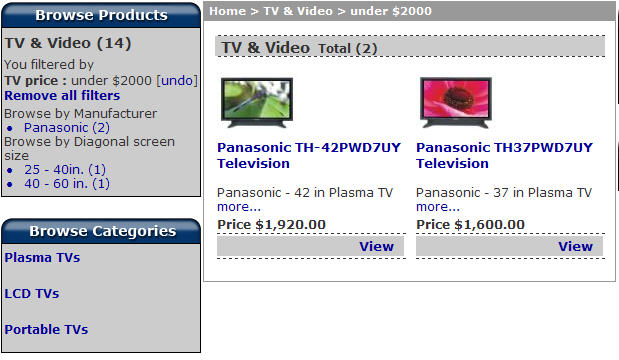
| Figure:
e-store front end: Choosing to see all the products under
$2000 makes browsing by TV price unavailable. |
Back end - Setting up the filters for your
e-store:
Defining your filter specifications is a straightforward
procedure and you can have a successful product filter running
in a matter of minutes.
The easiest way to start setting up a filter
group is by clicking "Catalog > Product Filters".

| Figure:
Setup your Product Filters by choosing "Catalog >
Product Filters" in the Administration Panel. |
Firstly you need to click the "Add New"
button and type in a name for this new filter group. Put in
something that is very clear about what you're trying to offer
and easy for you to remember its definition. Simple names
are easy to remember later on when adding them to your pages,
so for selling TVs "Manufacturer" and "TV price"
are good examples. In this case we will type "TV price"
and click the "Add Group" button to create the group.
As a note you are not creating this filter group for one page,
you can use it in any of the Catalog pages you need to apply
it in. It's a multipurpose selection.

| Figure:
A new filter group named "TV price" has just
been created. |
Now that we have the group name we need to add the
available TV price ranges to this group. To do this, simply
click the "Edit" link. You would normally start
with the smallest price, so you could type something like:
under $2000/$2000 to $5000/over $5000. There is plenty of
space for typing so keep it as clearly defined as possible.
You simply enter one filter value at a time and click the
"Add" button to make it active within the list.
When you have added all your options, check to see that you
have clicked the "Add" for the final option before
you click the "Save and Close" Button to finalise
your details.
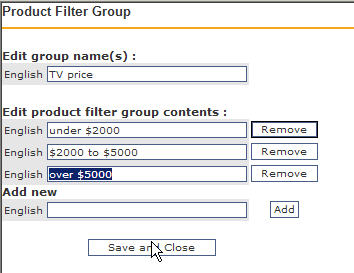
| Figure:
Adding Filters to the "TV price" group. |
Now that completes one part of the needed information,
and your option appears in the list. You can carry on adding
more options if you need to, or come back at any time to create
more product filter options as the need arises. The possibilities
are endless, and it comes down to what products you sell,
and how you want to market them.
Having the Product Filters created is now done
and these need to become visible in the Catalog. This is done
during the product creation process. In the "Add Product"
page you will find the form to use for defining the filter
values for your product:

| Figure:
Defining Filters for a product. |
You will notice that you can set a filter for your
product from one or more Filter Groups. In this example we
will be adding a sony TV set to the catalog with a 50 in.
Diagonal screen size costing $2499, so the previous form will
look as follows:
| Figure:
Defining Filters for a Sony TV set with a 50 in. Diagonal
screen size that costs $2499. |
Having assigned these filter values on the product,
the respective product page on the storefront will look like
this:
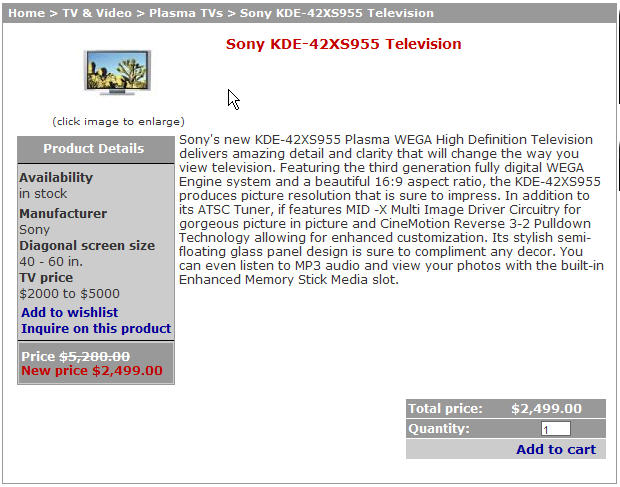
| Figure:
Storefront product page of the Sony TV set, after assigning
all filters. |
Deciding on your filter groups:
Extra attention should be given to deciding
the Filter Groups you will be defining for your products.
Decide on the categories you are going to create by keeping
in mind that:
 Filter Groups are general
categories giving crucial information about a product (e.g.
Manufacturer, Price etc.). Customers are more likely to
start looking for the desired product using these as the
initial criteria for their search. Filter Groups are general
categories giving crucial information about a product (e.g.
Manufacturer, Price etc.). Customers are more likely to
start looking for the desired product using these as the
initial criteria for their search.
Also remember that you are not creating a Filter
Group for one page, but you can use it in any of the Catalog
pages it applies to. Your selection of Filter Group is a multipurpose
one.
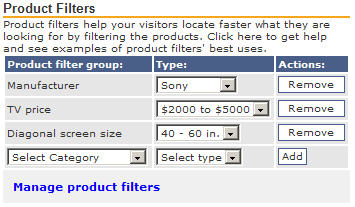
The following is an example of Product
Filters used for a range of TV products. As seen in the figure
different Filters of the "Manufacturer" Filter Group
are assigned to different products. If you are also selling
Sony cameras, this Filter Group can be used for these products
as well.
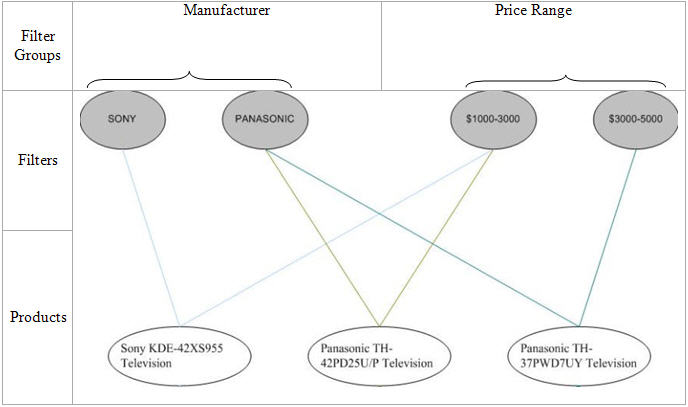
| Figure:
Filters related to a TV product range. |
Summary:
Click the "Add new"
button to create a Filter group.
List each Filter in turn
and click "Add" after each item, when all your items
are complete, click the "Save and Close" button.
When adding a new product
define the appropriate Filters for it in the "Add Product"
page.
Use the appropriate names
for your Filter Groups to make sure customer search is fast
and effective!
|