|
Setting up your shipping is a far simpler process
than you imagine it to be. With Magnet Commerce you can create
your own custom shipping options according to shipping destination
and weight or price. Alternatively, if your shipping origin
is within the US or Canada, you can connect live with popular
shipping companies for real time shipping cost calculation.
In order to set up your shipping options, access
the shipping administration panel from the "Setup > Shipping"
tab:

| Figure:
Setup your Shipping
Options by choosing "Setup > Shipping" in the Administration
Panel. |
 |
Before you add any data you
will need to consider all of your shipping options, from
land mail postal services to courier companies and find
which one offers the best price package for your needs.
All of these are dependent on weight. You entered weights
for your products when you created the items in the catalog
and this is where this information becomes important! |
There are two shipping modes available:
Custom shipping: This mode allows you
to create your own custom shipping options according to shipping
destination and weight or price.
Real Time Shipping:
This allows you to connect live with popular shipping
companies for automatic, real time calculation of the shipping
cost: When an order is placed, your Magnet Commerce
store will automatically transfer all relative information
of an order to the shipping company(/companies) connected
and get shipping cost information in real time.
Please note that this option is valid only when shipping
origin is within the USA or Canada!
Custom Shipping:
This mode is a most flexible way to create
your own custom shipping options according to shipping
destination and weight
or price.
The Custom Shipping Manager
The following form found in the Administration
Panel is used for adding Custom Shipping Options:

| Figure:
Creating Custom Shipping
Options. |
Name:
Define a name for the shipping type you are creating: "Standard
Mail", "Registered Mail" or "Special Delivery" are good suggestions
for land mail services, or simply the name of the courier
service.
You want to aim for something that says exactly the type of
service in no more than one or two words. Don't forget, the
customer will see this name so capitalise the first letters
to make a more appealing presentation.
Countries: This
is a very simple option to let you select countries that fall
into the shipping 'band' you're creating. When a Shipping
Option applies to more than one country you can group these
countries together. An example of this would be a UK and Ireland
only shipping for a UK Royal Mail service, or a courier service.
Click on the "Edit"
link to get the pop up window for selecting countries. To
specify the countries for which a specific option applies,
simply highlight to select the country you need, and then
click the button with the arrows facing to the right to add
it to the list. (Multiple selections can be made by holding
down the control key while selecting or by holding down the
shift key while selecting the first and the last country and
then clicking the arrows button as before.)
! If you select
a country from this menu, your current shipping option will
apply to all of the country's States by default. However,
if specific states of that country are selected from the States
menu (see below), your current shipping option will apply
to those states only and not the whole country! In other words,
in the
case of ambiguity, the States field is more powerful than
the Countries field.
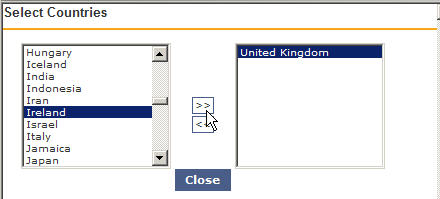
| Figure:
Selecting countries. |
Don't forget, this option is very versatile! You can
group together shipping destinations for Europe if you wanted
UPS or DHL shipping, or you can set specific Shipping Options
for an area in one country. This is only limited by how far
you are prepared to ship merchandise.
States: Certain
countries are broken down into separate States. This applies
especially to America, Canada, Greece, as well as the UK which
is split into different counties. Some areas have higher shipping
costs for remote locations; you need to check this with your
shipping company. You can leave these settings at default
in most cases, dependent on where you are based. The UK or
USA should be fine left alone, but for the highlands of Scotland
and certain remote islands like the Outer Hebrides a premium
is added to the shipping costs. You would simply exclude these
areas from the States list and create a separate shipping
option for such locations.
Click on the "Edit" link to get the pop up window
for selecting states. If you want to exclude a small number
of areas from a Shipping Option simply add all the areas to
the right list as described above,
then select the areas that you want to exclude from that list
and remove them by clicking on the button with the arrows
facing to the left:
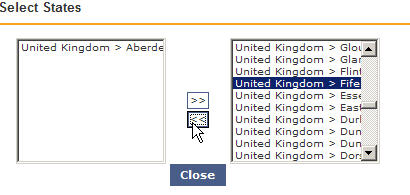
| Figure:
Excluding Aberdeen
and Fife from the list of UK counties the option applies
to. |
! If you
have already selected a country from the countries selection
menu (see above), your current shipping option will still
apply only to the States you have selected here and not the
whole country! In other words, in
the case of ambiguity, the States field is more powerful than
the Countries field.
Charge/Charges: You
have two choices for shipping: either by weight (which is
calculated on the weight you entered in: "Setup >
General > Weight Unit" text box), or by a set predefined
price. Both options are similar to set up so we will cover
the weight option to guide you through it. Remember, the shipping
is calculated on the total cost of the cart OR the total weight.
You need to select "by weight" from the "Charge"
drop down box and click "Update Setup". Then you
can click the "Edit" button under the "Charges" heading.
Your delivery service will offer you a weights and shipping
costs leaflet as a guide if you ask them. Try to keep the
charges as simple as possible and easy to understand. Your
first option is a base weight, so you need to start at 0 lbs,
or whatever weight method you use as defined in your setup/general
options (Lbs is the default).
In the following example the basic weight for the service
is 0 to 0.5 and the shipping cost for this is $1.50. Once
you have added both weights and the shipping cost, click on
the Add button to add your first weight 'band'. Don't worry
if the "0" is taken off the end at this point as this will
cause no problems. The next weight 'band' is 0.5kg to 1.5kg
costing $3.00. Note that you need to check that no weights
cross over. If your first weight option ended at 0.5, your
next one will start at 0.5. You carry this on until you have
covered all the weights you deal with. Remember to click the
Add button after each weight set and price is added, and when
you are finished click the "Save & Close" option.
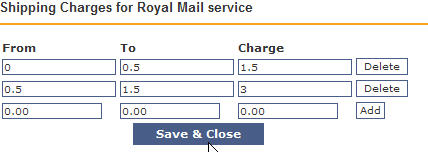
| Figure:
Setting charging scale
groups for a Shipping Option |
The "by price" option means that instead of
a weight basis of calculating shipping, you work on totals
of goods ordered. So you could ship a $300 order for free,
and orders of $25 or less could be set at $6.50 standard courier
charge. This does make it simpler for you to deal with if
you have large quantities of items per box you are shipping.
If you know that the most common type of order is 5 packs
of paper costing $25, you can ship that by land mail for $4.50,
and another common order is ink cartridges costing $18 but
the shipping is the same, then the by price option is an easier
way to calculate shipping costs. If your orders vary so much
that the weights are either very light or very heavy, then
the weights option should be used. You need to see what products
you have and what is commonly ordered to guide you in this
decision.
How to add a Custom Shipping Mode.
To add a new custom shipping mode, simply
type its name in the "Name" text box and click on
the "Add" button.

| Figure:
Adding a new Shipping
type. |
The new mode will be added to your list
of custom shipping options. You will then need to fill out
all other fields (Countries, States, Charge, Charges) following
the instructions and information provided above.
Examples.
Add a
"free shipping for orders over $50" custom mode
1. Add a name such as "Free Shipping over $50"
2. Edit "Countries" and/or "States" to
select the areas that this applies to
3. Set the "Charge" field to "by price"
4. Set 0 charge from 50 to a very high price value.
Add a "pickup
from store" custom mode
1. Add a name such as "Pickup from Store"
2. Edit the "States" fields to select the area(s)
of the store(s)
3. Set the "Charge" field to "by price"
4. Edit the "Charges" field and set 0 charge for
a range like 0-100000.
Real Time Shipping:
If you choose this mode your e-store will communicate
directly with FedEx, DHL and USPS and provide your customer
with accurate, up-to-date shipping cost, according to the
total weight of
the order and the shipping
destination.
!
- This method is applicable only when
your shipping
origin is within the USA or Canada!
- WEIGHT
MUST BE SET FOR ALL YOUR PRODUCTS AND IT HAS TO BE IN LBS,
if you want to enable real time shipping!
(The weight for each product is defined in the "Weight"
text box, under the product's "pricing" tab. The
weight unit is defined in: "Setup > General > Weight
Unit" text box.)
Defining the Shipping Origin
This is the address from which your orders will
be shipped.

| Figure:
Defining the address
from which the orders will be shipped. |
Country:
Choose the country of origin from the drop down menu. Remember:
the country of origin can be either the US or Canada!
State:
Choose the state of origin from the drop down menu.
Zip:
Define the zip code of the address of origin.
! This
address, together with the shipping destination and the order's
weight will be used by the shipping companies for calculating
the shipping costs.
The Real Time Shipping Manager
The following form found in the Administration
Panel is used for enabling Real Time Shipping Options:

| Figure:
Creating Real Time
Shipping Options. |
Name: Choose the
name of the shipping company and service you want to enable
from the drop down menu. This will be added to your
store's list of carriers.
Countries: This
is a very simple option to let you select countries that fall
into the shipping 'band' you're creating. When a Shipping
Option applies to more than one country you can group these
countries together. An example of this would be a USA and
Canada only shipping for a USPS service.
Click on the "Edit"
link to get the pop up window for selecting countries. To
specify the countries for which a specific option applies,
simply highlight to select the country you need, and then
click the button with the arrows facing to the right to add
it to the list. (Multiple selections can be made by holding
down the control key while selecting or by holding down the
shift key while selecting the first and the last country and
then clicking the arrows button as before.)
! If you select
a country from this menu, your current shipping option will
apply to all of the country's States by default. However,
if specific states of that country are selected from the States
menu (see below), your current shipping option will apply
to those states only and not the whole country! In other words,
in the
case of ambiguity, the States field is more powerful than
the Countries field.
| Figure:
Selecting countries. |
|
Don't forget, this option is
very versatile! You can group together shipping destinations
for Europe if you wanted USPS or DHL shipping, or you
can set specific Shipping Options for an area in one country.
This is only limited by how far you are prepared to ship
merchandise. |
States: Certain
countries are broken down into separate States. This applies
especially to America, Canada, Greece, as well as the UK which
is split into different counties. Some areas have higher shipping
costs for remote locations; you need to check this with your
shipping company. You can leave these settings at default
in most cases, dependent on where you are based. The UK or
USA should be fine left alone, but for the highlands of Scotland
and certain remote islands like the Outer Hebrides a premium
is added to the shipping costs. You would simply exclude these
areas from the States list and create a separate shipping
option for such locations.
Click on the "Edit" link to get the pop up window
for selecting states. If you want to exclude a small number
of areas from a Shipping Option simply add all the areas to
the right list as described above,
then select the areas that you want to exclude from that list
and remove them by clicking on the button with the arrows
facing to the left:
| Figure:
Excluding Aberdeen
and Fife from the list of UK counties the option applies
to. |
!
If you have already selected a country
from the countries selection menu (see above), your current
shipping option will still apply only to the States you have
selected here and not the whole country! In other words, in
the case of ambiguity, the States field is more powerful than
the Countries field
Markup: The amount
to add to (or remove from) the price of shipping. An example
where this would be useful is adding an extra charge to cover
packaging costs. This can be a set amount or a percentage
of the shipping cost.
! All
real time rates in Magnet Commerce are the same rates you
would get from the shipping company's website (e.g. USPS.com).
If you have negotiated for a lower rate than normal with one
of these companies, Magnet Commerce will not return your discounted
rates, as the shipping company's interfaces do not allow for
this. In such a case please use a negative markup value. For
example, if you get 10% off the normal rates for a service,
set the respective markup value to -10.
This only applies to shipping companies that provide merchants
with public accounts, such as USPS or DHL. Magnet Commerce
will return the discounted rates for companies using personal
merchant accounts, such as FedEx.
Markup is:
Define whether the extra amount defined in Markup is a fixed
value or a percent of the shipping cost.
Restrict: Define whether
the values in the "Low" and "High" text
fields (see below) refer to an order's weight or price.
Low: The
shipping method will not be used only if the weight or price
(measure chosen in the "Restrict" field) of an order
is higher than the value set in this field.
For example, the value in this field can be used for enabling
a shipping mode with extra charge for heavy orders - see the
first case under the examples section.
High: The shipping method
will not be used only if the weight or price (measure chosen
in the "Restrict" field) of an order is lower than
the value set in this field.
For example, the value in this field can be used for enabling
an economy shipping mode for orders up to a certain price
- see the second case under the
examples section.
How to add a Real Time Shipping Mode.
To enable a real time shipping mode to
your Magnet Commerce store, simply choose it from the "Name"
drop down menu and click on the "Add" button.

| Figure:
Adding a new Real
Time Shipping mode. |
The new mode will be added to your list of real
time shipping options. You will then need to fill out all
other fields (Countries, States, Markup, Markup is, Restrict,
Low, High) following the instructions and information provided
above.
Connecting with FedEx.
If you want to connect with FedEx you will first
need to get a personal merchant account number.
Your account information will be stored in the "Account
Number" and "Meter Number" text fields shown
below:

| Figure:
Provide a FedEx account
and meter number for connecting live with the service. |
Account Number:
The account number that FedEx has provided you with
Meter Number:
Your FedEx meter number: To get this click on "Create"
To input your account number and get a meter number, click
on the "Create" box. The following pop-up
window will appear:
! You must
have a FedEx account number before you can apply for a meter
number!
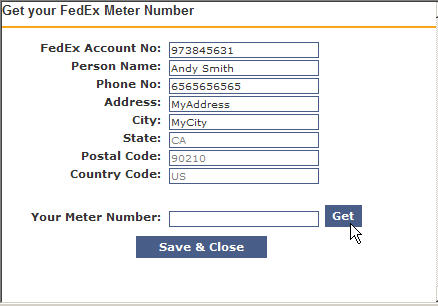
| Figure:
Getting a FedEx meter
number. |
Type in your FedEx account and personal information
and click on "Get". FedEx will provide you with
a unique Meter Number on the spot. Click "Save and Close"
to add your account and meter number.
This process is only performed once. After that
you will be able to offer Fedex real time shipping rates on
your store!
Examples.
Add
a shipping mode with a 10% markup for orders weighting more
than 10 lbs
1. Set the "Markup" to 10
2. Set the "Markup is" field to "percent"
3. Set the "Restrict" field to "by
weight"
4. Set "Low" to 10
5. Set "High" to a very high value.
Add
an USPS economy parcel postage service for orders in the state
of NY and for orders up to $50
1. Set the "Name" field to "USPS
- Economy (Surface) Parcel Post"
2. Set the "State" to "United States
> NY"
3. Set the "Restrict" field to "by
price"
4. Set "Low" to 0
5. Set "High" to 50.
Saving Shipping
Options:

| Figure:
When you have finished
setting up your shipping options click on the "Update
Setup" button. |
When you have finished, click on the "Update
Setup" button, at the bottom of the shipping page,
to save all custom and real time shipping options you have
setup!
! To view
a newly added shipping mode on your store front, you will
need to load your e-store on a new browser page!
Summary:
 There are two shipping
modes available: Custom
Shipping, which allows you to create your own custom
shipping options according to shipping destination and weight
or price, and Real Time Shipping that allows you to connect
live with popular shipping companies for automatic, real time
calculation of the shipping cost. There are two shipping
modes available: Custom
Shipping, which allows you to create your own custom
shipping options according to shipping destination and weight
or price, and Real Time Shipping that allows you to connect
live with popular shipping companies for automatic, real time
calculation of the shipping cost.
Custom
shipping:
Assign a name to the shipping type you are creating and
click add. Then select the countries or states where this
type applies. Next set the costs according to the price or
weight of the total order.
You can use two or more methods to ship to one region: a standard
service that's cheap but takes longer or a priority mail service
that's faster and costs a little more. This lets your customers
decide which service is better suited to their needs.
You can define different shipping costs for the same type
of shipping, e.g. one cost for shipping to your state, and
one for all other states. Simply select your state only in
the first option, and all others except yours in the second.
That way two prices can be defined.
To offer free shipping for orders over a certain amount add
a new shipping type with a name such as "Free Shipping
over $50" , select the areas that this applies to, select
to charge by price and set zero charge from 50 to 100000.
We suggest the amount to be slightly over your average sale.
Don't forget to advertise this offer in your store!
To offer a pickup from store option, add a new shipping type
with a name such as "Pickup from Store", select
the area of the store only, select to charge by price and
set zero charge from 0 to 100000. But please be sure to allow
plenty of time for you to have the goods ready for collection
in good time. If you have multiple stores, you can ask your
customer to choose one during checkout by adding a "checkout
question" from the "marketing" tab.
Real Time Shipping:
To enable a real time shipping mode, simply choose it
from the "Name" drop down menu and click on the
"Add" button. You will then need to define the countries/states
and the price or weight range for which it will be enabled,
and any extra charges you want to apply. You will also
need to define the country, state and zip code of the address
of origin. This address, together with the shipping destination
and the order's weight will be used by the shipping companies
for calculating the shipping costs.
Real Time Shipping is valid only when shipping origin
is within the USA or Canada!
To work correctly, weight must be set for all you products
and it must be in lbs!
To apply a shipping method
to selected states, do not add their respective country from
the countries selection menu.
To view a newly added
shipping mode on your store front, you will need to open your
e-store on a new browser!
Before your store goes
live you want to check all of your shipping rates, mistakes
can eat into profits rapidly!! You have a quick calculation
tool to check that everything is working correctly. Check
everything carefully as it is best and simple to trace and
fix mistakes early in the SetUp process.
Magnetcommerce also allows
the customer to see shipping charges early on in the ordering
process by means of a quick calculation tool; this provides
the critical information all customers need in a quick and
straightforward way.
This may sound obvious
but it's an important point, check the spelling and capitalisation
of your shipping descriptions. Mistakes look unprofessional
and can easily deter a potential customer for life.
The statistics are clear;
a happy customer tells only 5% of people of a good store,
an unhappy customer tells 95% of people of problems and mistakes.
Check and double check everything carefully.
Remember if you make a mistake, click
the button relating to the section and read through it slowly
to find the problem. When you have found it, highlight it,
change it and click the save button to amend the changes.
If you have any problems please feel free to contact
us for some additional expert help.
|