Import/Export
Products
Magnet Commerce allows you to quickly import
existing product databases into your storefront, by use of the
import tab. It also lets you export all the products and any
relative information (e.g. description, price, images and more)
from your store, using the export tab.
This chapter will teach you how to:
• Use the bulk import function to
add products to your store
• Use the export function to get
a file containing all products and any relative information
from your store
! The
fields in the import and export file are not identical
The
Magnet Commerce Product Import Function:
Magnet Commerce allows you to freely import
existing product databases into your storefront, by use of
the integrated import function. In order to do so, we recommend
that you organise your data in a data feed file using a computer's
spreadsheet program such as Microsoft Excel. Then you would
simply upload this file to your e-store by using the "Import"
functionality.
Editing the data feed file to import:
To create a data feed file containing the data
you wish to import, open a new file in your computer's preferable
spreadsheet program. You can use a spreadsheet program, such
as Microsoft Excel, Notepad or WordPad. We recommend that
you use Microsoft Excel since it makes it easy to convert
your file to the proper format. However, if you choose to
go with a text editor, such as Notepad or WordPad, just make
sure that every field is separated by only one tab when creating
your file.
The data feed to import must contain all
products you want to import -one product per line.
Following is an example of a datafeed file:
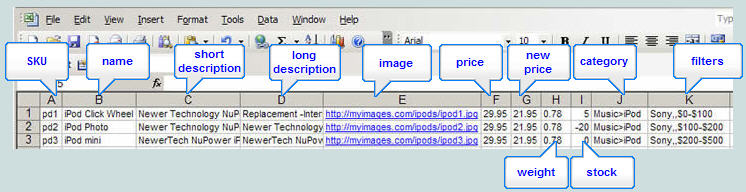
| Figure:
Creating the data feed file to import. |
!
Right click here
and choose "Save Target As..." to download a template
import file. Open the file in excell and add your products.
If you want, you can try importing the file as it is, to see
the new categories "skirts >>> summer skirts"
and product "Armani beacj skirt" automatically added.
The fields on each column are:
Column A: (SKU) The unique product
identification tag.
Column B: (Name)
The product's name or title as you would like it to appear
on the product page.
Column C: (Short description)
The product's short description as you
would like it to appear on pages listing categories and search
results.
Column D: (Long description)
The product's long description
as you would like it to appear on the product page.
Column E: (Image URL)
The full URL of the product image.
! Import only
lets you upload one image per product.
Column F: (Price)
The product's price. Always
use the dot "." as the decimal separator.
Column G: (New price)
The product's new price, should you need
to include a discount.
Column H: (Weight)
The product's weight. Always use the dot "." as
the decimal separator.
Column I: (Stock) A number indicating
the product tokens in stock. This can be 0 if the product
is out of stock (or even a negative digit if backorders are
allowed), or any positive digit for a limited product stock.
Use a large number (e.g. 9999) for unlimited product stock.
Column J: (Category)
The category in which the product gets
listed. If the category you are typing here doesn't exist,
it will be automatically created when importing your datafeed.
Be sure to use a ">" when separating category
levels. For example "Music>iPod".
! if you want
to import a product in the "iPod" category, which
is a subcategory of the root category "Music", you
need to type "Music>iPod" in the category field.
If you only type "iPod", a new root category "iPod"
will be created and the product will be listed under it.
! if you want
to add a product in more than one category, you need to define
every category in a different line. For example, if you want
the 'iPod Cleek Wheel' to appear in "Music>iPod"
and in "Entertainment", you need to use 2 lines
for this product in your datafeed. Apart form the Category
Column, the information in all other fields is the same:

| Figure:
If you want to list a product in more than one category,
you need to define every category in a different line.
Apart from the J (category) column, all other info should
be identical. |
Column K: (Filters) The product
filter values, separated by commas. You should first create
your product filters on your administration before assigning
filters to products using the import function.
! The order
of the filters here is important! Check the order of your
filter groups on your administration and use the same order
when adding filters on your datafeed. For example, lets say
you have 3 filter groups on your store in the following order:
"Manufacturer", "Memory", "Price":

| Figure:
Filters setup on your administration. The order set here
is important when adding product filters automatically! |
If you want to import a product with
the filter values Manufacturer->Sony and Price->$200-$500,
you need to type:
"Sony,,$200-$500" in the filter field of your datafeed.
Please note the absence of a filter value between the two
commas which means that you are not assigning a "Memory"
filter value to your product.
For more on product filters please read here.
! From all
previous fields, only "Name" is obligatory in order
to import a product. However, when leaving out some fields
make sure you use the right columns for the information you
want to import. For example, if you only want to import "Name"
and "Long Description", type the product names in
column B, the descriptions in column D, and leave all other
columns blank.
Attention!
If you don't specify a category (column J) for a product,
it will get listed under the root category.
! You can
change information of products (e.g. description, price etc.)
that are already listed in your catalog using the import function.
In order to overwrite a product, you need to define its exact
name, SKU (leave blank if no SKU has been defined) and category
(leave blank if product is listed under the root category)
in the import file.
Attention! If you leave
undefined fields in the import file for existing products
that have these fields set, the fields will be deleted. E.g.
if you already have a product in you store with a long description,
and you leave the long description field of that product empty
in the import file, the existing description will be deleted
from your store.
An exception of this is column E (containing the product image).
If this is blank, the product images will stay as they are.
Saving the data feed file to import:
Once you have finished listing all of your products
in your spreadsheet, save your file in a format that Magnet
Commerce can process. Here is how:
1. Open the File menu in the top left corner and click on the "Save
As..." tab.
2. Select Text (Tab delimited) (*.txt) from the "Save as type..."
drop down menu.
3. Type the filename of the file that you want your data feed file
to be saved as.
4. Click the Save button. If you see a warning window pop up, click
the "OK" button. If you see a second warning message,
click the "Yes" button.
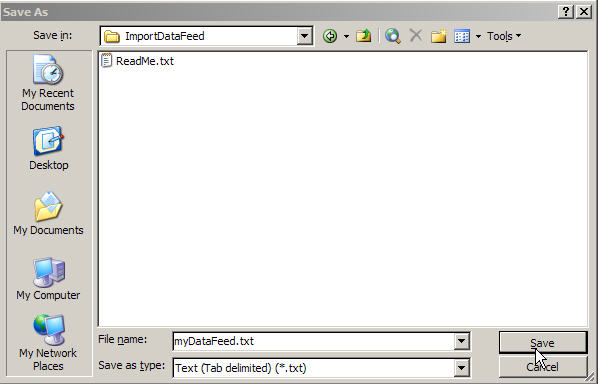
| Figure:
Saving the data feed file. |
! When adding
products in a non-latin language (greek, japanesse, chinese,
arabic etc.), you need to save the file you want to import
in a utf8 format:
Once you have saved your datafeed as described above, make
a copy of this file, open
the copy using notepad,
save it using utf8 encoding and import it to your store using
the information below. Please make sure you make a copy of
your datafeed, as it is likely you won't be able to edit it
again once you've saved it in utf8 encoding!
Importing the data feed file to your
e-store:
After creating the data feed file you need to upload
the file to your e-store's catalog. You can do this by selecting
" Catalog > Import " in the Administration panel:

| Figure:
Import the data feed file by choosing "Catalog >
Import" in the Administration Panel. |
The "Import products" pop up window
will appear. To import your datafeed:
1. Use the "Browse" button to locate the data feed
file (alternatively you can type the file's full pathname
in the text box provided).
2. Select the language tab in which your product will be added
(This is import for multi-language shops only!).
3. Before importing your products you have the option of deleting
all existing categories and/or products from your e-store.
You can do this by ticking the respective check boxes provided.
4. Finally click the "Import" button to upload the
data feed file.
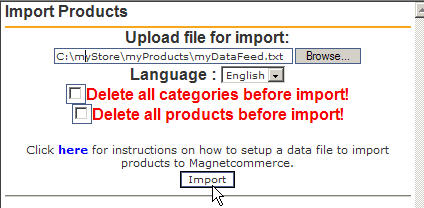
| Figure:
Import the data feed file. |
Imported products on the store front:
Once the data feed file has been successfully
imported, you can check your storefront to view the imported
files.
! The
same order in which the products are listed in the datafeed
file is used for adding them in categories and filters and
for presenting them on the store's pages.
Indeed once the data feed file shown
above is imported, a new "Music" category appears
on the store's front end:

| Figure:
"Music" category appearing
on the storefront, after importing the aforementioned
data feed file. |
The "iPod" category (listed inside
the "Music" category), contains all 3 products we
added using the data feed file:
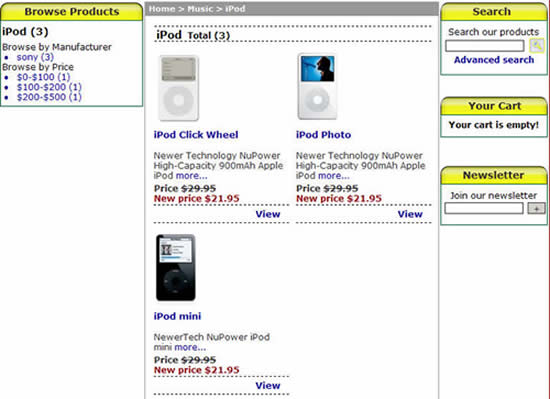
| Figure:
Contents of the iPod category appearing on the storefront. |
The
Magnet Commerce Product Export Function:
Exporting products from your e-store:
To export your products from your e-store simply
click on the "Catalog > Export" tab in the Administration
Panel:

| Figure:
Choose "Catalog > Export" to get a file containing
all your products. |
A pop up window will appear, informing you that the data
feed file containing the exported products will be sent to
you by email to your registered e-mail account(s) - the one(s)
defined in the "Setup > General > Sales email"
text box.

| Figure:
A message will appear informing you that the feed file
will be sent to you by email. |
Export file:
You will receive the product export
file as an attachment on your mail. Save the file on your
hard disk and open it using your preferable spreadsheet program.
Th file has the following format:

| Figure:
The product export file as created by your Magnet Commerce
store. |
The fields on each column are:
Column A: (part) The unique product
identification tag (SKU).
Column B: (name)
The product's name as it appears on the product page.
Column C: (short description)
The product's short description as it appears
on pages listing categories and search results.
Column D: (description)
The product's long description as it appears on the product
page.
Column E: (image Src)
The full URL of the product image.
Column F: (price) The
product's price. The dot "." is used as the decimal
separator.
Column G: (new price) The
product's new price, if there is a discount.
Column H: (stock)
A number indicating the product tokens in stock. This is 0
if the product is out of stock (or even a negative digit if
back orders are allowed), or any positive digit for a limited
product stock. 9999 is used for unlimited product stock.
Column I: (category)
The category under which the product is listed.
Note: The full path of the category in which the product
belongs is listed. For example, if a product belongs to the
"iPod" category, which is a subcategory of the root
category "Music", the value of this field would
be "Music>iPod"
! If
a product belongs to more than one categories, it will occupy
more than one lines in the export file:

| Figure:
If a product belongs to 2 categories, it will occupy 2
lines in the export file. The contents of the 2 lines
will be identical, apart from the column showing the categories. |
Column J: (types) The
product filter values, separated by commas.
Note: The order of the filters here is important! Check
the order of your filter groups on your administration ('Catalog
> Product Filters' tab), to find out which filters these
values refer to.
Column J: (link URL)
If you have added a redirect link on a product page, this
link appears here. Redirect links are defined in the product
presentation section of your administration.
An example where you would use redirect links is for building
a shopping catalog. In such a case you probably want your
visitor to be redirected to the product seller's page once
the product has been selected.
Summary:
 To import product databases
to an e-store, create a tab delimited data feed file and import
it using the "Import" tab in the Administration
Panel. To import product databases
to an e-store, create a tab delimited data feed file and import
it using the "Import" tab in the Administration
Panel.
To export products from
an e-store, use the "Export" tab in the Administration
panel. A data feed file containing the exported products will
be sent to you by email.
You can import products
that already exist on your store, but keep in mind that the
values of an existing product (e.g. description, price etc.)
will be overwritten by the ones defined in your import file.
|