Effective
Use of Product Variants
It's fairly common when creating a shop
to have products that are available in different colours,
sizes, styles, guarantee options and to have other slight
differences with the same product. To sell these products
you can either create a separate page for each product, or
use a product variant to preset styles/colours etc. Selling
a t-shirt is one thing, but getting the right size garment
is crucial to your customer. This is not as complicated as
you might first think and you can have a successful product
variant running in a matter of minutes.
The easiest way to set up your variant groups
is by clicking Catalog/ Product Variants.

| Figure:
Setup your Product Variants by choosing "Catalog
> Product Variants" in the Administration Panel. |
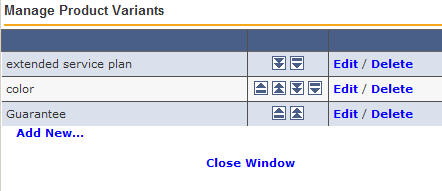
A pop up window listing any variants available will appear.
| Figure:
Open the "Manage Product Variants" window to
add new variant groups and edit or delete existing ones. |
The window has links for creating a new
variant group and editing or deleting any existing ones.
Note: If you delete a variant group that affects
product stock (such as 'Color' or 'Size'), the stock of
all the products using this group will be set to 0 and any
current stock settings for these products will be lost.
Create a new variant group:
Firstly you need to click the "Add
New" button and type in a name for this new variant group.
Put in something that is very clear about what you're trying
to offer and easy for you to remember its definition. Simple
names are easy for you to remember later on when adding them
to your pages, so "Guarantee", "Colour"
and even "Style" should be important factors. So
for example here we will use "Guarantee".
! If your
store is in more than one language, you will define a separate
name for each language.
You also need to define
whether the variant group affects the product stock or not.
For example 'Size' might affect product stock but 'Guarantee'
wouldn't. Tick the box only if this group affects your product
stock.
! Once this
is defined here it can not change later on so be sure to get
this setting right!
| Figure:
Creating the new variant group "Guarantee". |
When you have finished click the "Add
Group" button to create the group. The new variant group
now appears on the list:
| Figure:
A new variant group named "Guarantee" has just
been created. |
! You are
not creating a variant group for one product, you can use
it in any of the products you need to apply it in. It's a
multipurpose selection.
Edit the variants of a group:
Now that we have created the group name
we need to add the available guarantee periods to the group.
Clicking "Edit" will let you add more options within
the group. You would normally start with the shortest period,
so you can offer it in a simple format like 1yr/2yrs/3yrs+
or by typing 1 year/2 years/3 years or more. There is plenty
of space for typing so keep it as clearly defined as possible.
You simply enter one at a time and click the "Add"
button to make it active within the list. Once you have added
all your options, check to see that you have clicked the "Add"
button for the last option you added and then click the "Save
and Close" button to finalise your details.
| Figure:
Adding Variants to the "Guarantee" group. |
Now that completes one part of the needed
information, and your option appears on the list. You can
carry on adding more options if you need to, or come back
at any time to create more product variant options as the
need arises. The possibilities are endless, and it comes down
to what products you sell, and how you want to market them.
Applying product variants to your products:
Having the Product Variants created is
now done and we need to make them visible in the Catalog.
After you have created an item in the Catalog that requires
a variant, simply click the "Pricing" Tab. Below
the price is the variants section, now all the variants you
have created are in the drop down box on the left, click it
and select the option you require. In our case we opted for
"Guarantee".
You will notice that you can select one or all
of the differences within a variant, either a certain period
or all together. That way if some items are only available
with a specific guarantee option, you can still offer it with
the certain guarantee and it makes it perfectly clear to the
customer there is only one guarantee option available. Alternatively,
if all variants are available you can just choose "All"
in the "Description" field to insert them all in
one go. But keep in mind that unless you choose "All",
you will have to define here all the variants available, one
after the other, or these won't be visible on your storefront
page!

| Figure:
Defining Variants for a product. |
Moving along from there we have a price change
option. Products can vary in price according to the guarantee
period offered; a "3 year or more" guarantee for
example can be more pricey than a "1 year" guarantee,
so you can add the extra cost by typing it in the box. You
have two options for the price also, a percentage of the cost
of a normal product, or a simpler fixed price. This way as
the guarantee period increases you could add a 10% surcharge
on the normal price, or simply a "3 years or more"
guarantee option can be offered with a fixed surcharge.
Differences between the variants offered can
be displayed by adding a thumbnail. That's a very important
selling point. You could display the exact product each variant
refers to so people can clearly see any differences. Your
customers will be more likely to purchase if they can see
the product they are buying and differences with other similar
items. When you're all done, click the "Add New"
button, and if you need to, add another product variant to
the same Catalog entry. There is no limit to the number of
variants you can have, you can add one for guarantee and one
for color. But you don't want to add too many as this could
make ordering complicated. Simpler is better and faster for
the customer.
Once all the variants of a camera product have
been added, the complete variant form will look as follows.
Note that you can change the order in which the variants will
appear on your storefront by using the buttons under the "Order"
list. Click on the "Remove" button under the "Actions"
list to remove any Variants you don't want to keep.
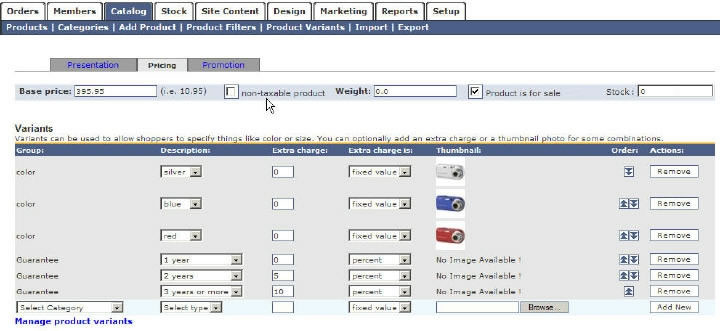
| Figure:
Defining Variants for a camera available in 3 Colors (silver,
blue and red) that comes with 3 Guarantee options. |
! Variant groups
can affect or not affect the product stock (e.g. 'Color' and
'Size' might affect stock but 'Guarantee' wouldn't). If you
introduce or delete variants that affect stock, the current
stock status of your product will change. This happens because
the stock status differs for every variant combination and some
(or all) variant combinations will be reproduced. The stock
of the new combinations will be set to either 9999 (when you
introduce) or 0 (when you delete).
Having assigned these variant values on the
product, the respective product page on the storefront will
look like this:

| Figure:
Storefront product page of the camera, after assigning
all variants. |
Distinguish between Product Filters and
Product Variants:
Extra attention should be paid when deciding
the Filter and Variant Groups you will be setting for your
products. Decide on the categories you are going to create
by keeping in mind that:
 Filter Groups are general
categories giving crucial information about a product (e.g.
Manufacturer, Price etc.). Customers are more likely to
start looking for the desired product using these as the
initial criteria for their search. Filter Groups are general
categories giving crucial information about a product (e.g.
Manufacturer, Price etc.). Customers are more likely to
start looking for the desired product using these as the
initial criteria for their search.
Variant Groups are used
to further define a product (e.g. Color, Style, Size, Guarantee
etc.). You will use these to effectively show the variation
of your product range, to add extra charge for certain product
variants (e.g. large sizes or long guarantee periods) etc.
The following is an example of Product
Filters and Variants used for a range of TV products:
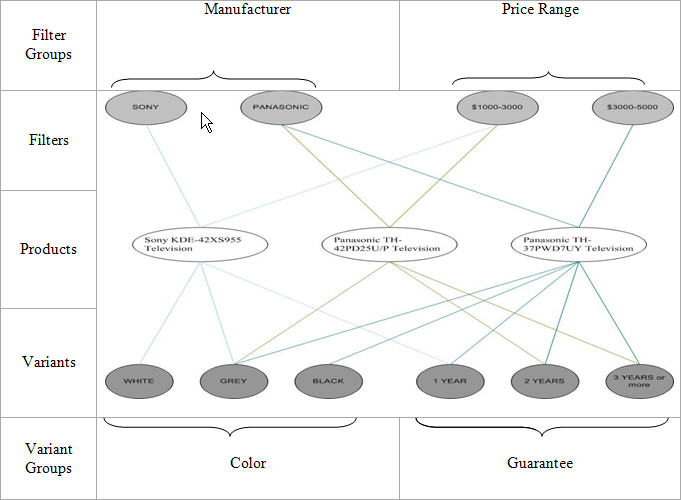
| Figure:
Filters and Variants related to a TV product range. |
Summary:
Click the "Add new"
button to create a group.
Once your group is created
click "Edit" to list each difference in turn and
click "Add" after each item. When all your items
are complete, click the "Save and Close" button.
To use variants on products
got to the product "Pricing" tab and use the drop
down list to select which variant you want to add. Make sure
to double check any additional costs. Use the easiest option
to achieve this, a set price addition or a percentage. You
can add as many product variants as you need, but try to keep
it to a maximum of two, for example colour and guarantee.
Keep in mind that you
will use Filter Groups to help your customers find the product
desired but Variant Groups to show the variation of your product
range.
|