|
You can add as many custom pages as you
like on your Magnet Commerce e-store. These could be pages
with information such as returns policy, customer service,
shipping etc. and will appear at the top right of your store
front.
Add a new custom page:
To add custom pages to your e-store, access
the custom pages administration panel from the "Site
Content> Custom Pages" tab:

| Figure:
Setup your e-store's
custom pages by choosing "Site Content> Custom
Pages" in the Administration Panel. |
From the custom pages administration panel,
you can add new pages and edit or delete
existing ones.
To add a new custom page simply type
its name in the text box provided and press the "Add
new" link:
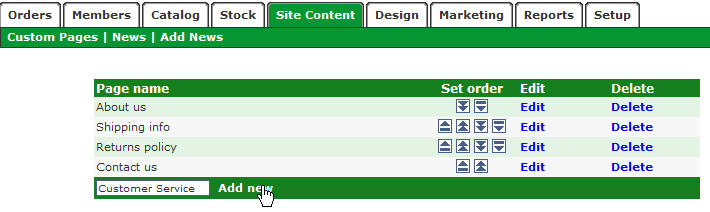
| Figure:
To add a new page
type its name and press "Add new". |
Using the buttons in the "Set order"
list you can control the order in which the pages will appear
on your online store.
To delete an existing page simple press
the "Delete" link.
Once a new page has been added you need to compose
its content using the "Edit" link (you can also
use this link to view or edit the contents of an existing
page). A page editor similar to the following appears:
| Figure:
Edit the content of
a custom page and press "Save changes" |
The Magnet Commerce page editor comes with many
of the powerful functionalities of known desktop editors:
• The advanced toolbar contains buttons
for:
All common editing commands: "cut", "copy",
"paste", "paste from word", "delete",
"full page", "undo and redo" actions:

Text formatting options: "bold",
"italics", "underline", "strikethrough
line", "superscript" and "subscript
text", "font color", "highlighting"
and "text alignment":
 
Insert options: "Table" insert,
"horizontal line" insert, "hyperlink"
insert and delete, "anchor" insert. Also "select
all", "position absolutely" and "visible
orders" buttons are available:

• Alternatively, right clicking
in the text editor box gives a menu with numerous options
for inserting, text editing and formatting. For example, using
the insert tab, you could insert images, videos, pdf documents
etc.
• You can also view or edit the html
code of a page by choosing the html view button, at the bottom
of the editor.
• To easily insert a contact form
on your custom page, press the "Insert contact form"
link. Use this functionality when composing a "Contact
us" page!
Once you have finished editing your custom pages
press the "Save changes" button to save your
page.
Custom pages on the store front:
All custom pages added will appear at the top right corner
of your store's pages, and will link to the pages you have
composed :
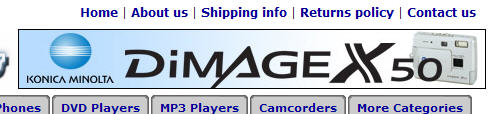
| Figure:
Custom pages on the
store front |
The order will be the one
set under the "Set order" column in the "Site
Content > Custom Pages" tab
Summary:
 Go to "Site Content
> Custom Pages" in the Administration Panel to compose
custom pages you want to add to your e-store, for example:
"About us", "Returns Policy", "Contact
us" etc Go to "Site Content
> Custom Pages" in the Administration Panel to compose
custom pages you want to add to your e-store, for example:
"About us", "Returns Policy", "Contact
us" etc
From the custom pages
administration panel, you can add new pages and edit
or delete existing ones.
Use the "Edit"
link to view or edit the contents of a page
The text editor comes
with numerous options for inserting, text editing and formatting.
Press the "html" button to view and edit the html
code of a page. Use the "Insert contact form" link
to quickly insert a form on your page. When you have finished
editing a page press the "Save changes" button to
save your changes.
|