Managing
Orders
This "How-To" guide will teach
you how to:
•View incoming, existing & past orders.
•View Customer details such as order history, payment
details and feedback.
•Edit & delete order information.
•Send e-mail notifications to Customers about order status.
•Perform an order on your
storefront.
Managing your orders:
Once you have set up your Magnet E-Commerce
store (see e-store
Setup section), you will be ready to start receiving and
managing your incoming orders. This can all be done from the
"Orders" tab of your "Administration Panel".

| Figure:
To view the Orders menu, log into your Magnet account
and click on the "Orders" tab in the Administration
Panel. |
Orders Menu:
Right below the "Orders" tab you will
see the "Orders" menu. This menu consists of 2 commands,
"View" and Export".
By clicking the "Orders" tab the contents of "View"
will appear by default.
In the "View" tab you will see a list of all your
"Orders", as shown in the following picture:
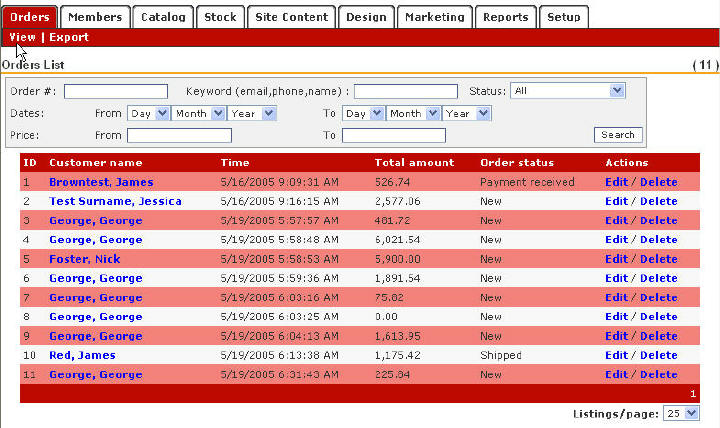
| Figure:
Clicking "Orders
> View" in the Administration panel will allow
you to see a list of all your "Orders" |
Clicking on the "Export" tab will allow
you to receive a .txt file of all your orders via e-mail (the
e-mail will be sent to the address you have registered during
setup). This txt file can be easily imported into programs
such as Microsoft Excel.
!
About Opening Text Files in Excel:
To open a .txt file in Excel follow these steps:
• Save the .txt file onto your Desktop or in a folder that
you can easily find.
• Open Microsoft Excel.
• Go to File → Open and find the .txt file.
• A "Text Import Wizard" will come up and ask you
what kind of data you have. Always make sure that you select "Delimited".
Click on "Next".
• The "Text Import Wizard" will then ask you to choose
the delimiters in your document. Select "Tab" and click
"Next".
• The "Text Import Wizard" will then let you select
each column and set the data format for each. You can just select
"General" for all. Then click "Next".
• You will then see an Excel document with all your data in
its proper column with headings. Note: To see the "Telephone#"
column the proper way, format the cells to Special →Phone Number
by right-clicking on the Column header. See Image below:
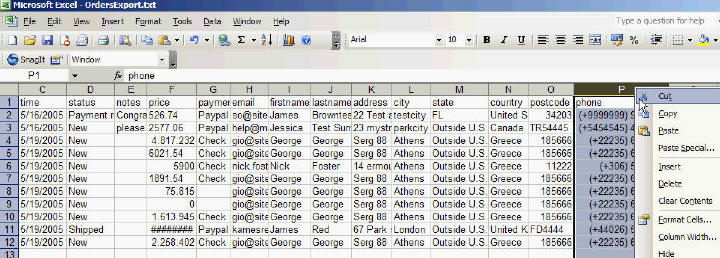
| Figure:
The orders export file in Microsoft Excel. |
Orders Search:
Right below the "Orders" tab,
you will see a search function. This function allows you to
view order information and make updates to orders as needed.
This function's search criteria allow you to narrow down the
orders and locate tracking numbers based on order #, status,
date or price. In the following figure a search is performed
for "new" orders placed on the first day of May
2005 only:

| Figure:
Orders Search function. |
Orders List
Right below the search function, you will see
a list of all your new, existing and past orders. This is
called your Orders List.
Each order has several attributes that
are represented as columns on the Orders list:
!
Each column on the Orders List
can be sorted in ascending or descending order, by clicking
the title of the column. For example, to sort orders in ascending
order by ID. Simply click on "ID". To sort back
in ascending order, click on ID again.
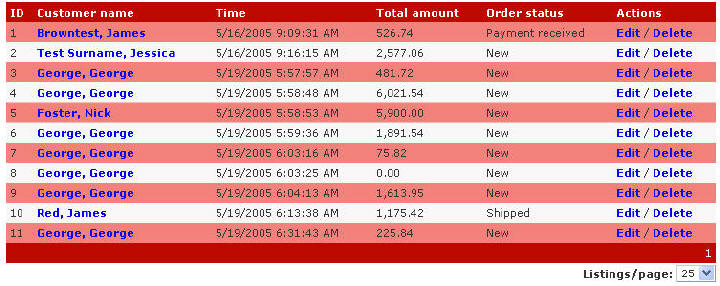
The Orders List contains the following fields:
ID Number:
Lists the Order ID number which is automatically given to
each order as it comes in.
Customer Name:
Lists your Customer Name. Names are listed by "Last Name,
First, Name".
Time: Lists what
day/time your orders were received at.
Total Amount:
Lists the total amount of the order. This total includes taxes
and shipping costs.
Order Status:
Lists the order status. You can update the status of an order
by clicking "Edit" in Column 6 .
Actions: Shows
you "Edit/Delete". By clicking on "Edit"
you will be allowed to edit order information. For example,
you can change the status of an order from "New"
to "Shipped" and you can also see further more specific
order attributes like full customer information, payment details,
shipping information, etc. You can also Delete an order out
of your system by clicking on "Delete".
! When
you choose to "Delete" an order, the order information
will totally be deleted from the system so make sure you really
want to do this. This option is different from setting the
order's status to cancelled, in which case the order is still
available in the system.
Detailed Order Information:
To view "Detailed Order Information" from
the "Orders List", click the "Edit" link
in the "Actions" Column.

| Figure:
To view "Detailed
Order Information" for an order click the "Edit"
link. |
At the top of the screen you will see a
section titled "Order Information".
| Figure:
Detailed Order Information.
Top Screen. |
This section will list:
A. Order
ID Number.
B. Order Status and email notification:
The "Order Status" tag is changed by selecting the
pull-down on the right-hand side. You can set your order status
to: "New", "Payment Received", "Shipped",
"Completed" or "Cancelled". You also have
to option to notify your customer about the order status via
email. To do so tick the "Send email notification"
check box. The standard content of this email can be defined
and edited from "Setup > Texts > E-mail texts"
form. Type any additional text for this email in the text
box provided. Finally, click the "Submit" button
to apply these settings.
C. Customer
Notes: Feedback received from your Customers.
D. Admin
Notes: Your notes concerning the order. Click the "Save"
button to save your notes.
! When you
change the status of an order to "shipped", include
the order's tracking number in the additional text field provided
for the email.
! You can
change the order status keywords ("New", "Payment
Received", "Shipped", "Completed"
or "Cancelled") from "Setup > Texts >
General Texts"
! In
a multilingual shop, your customers will receive order status
update notifications in the language they have used for placing
their orders
Following the "Order Information" is the
"Customer and Shipping Information" section.
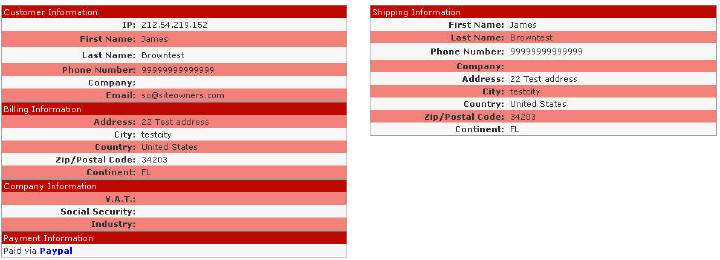
| Figure:
Detailed Customer and Shipping Information. Middle Screen |
This section shows:
A. Customer information:
IP, First and Last name, Phone number, Company (for corporate
orders) and Email.
B. Billing Information: Billing
Address including City, Country, Zip Code and Continent.
C. Company Information: For corporate orders, the company's
VAT, Social Security and Industry..
D. Payment Information: Payment method chosen for this
order.
E. Shipping Information: Full shipping address and
phone number.
The last section of the screen lists the product's
name, quantity and total price:
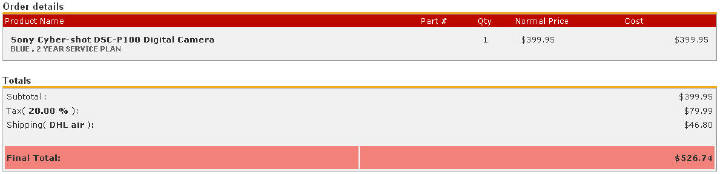
| Figure:
Detailed Product and
Pricing Information. Middle Screen |
The third section lists:
A. Order Details: The
product's name (including the variants chosen, e.g. color,
service plan etc.), quantity and price.
B. Totals: Full breakdown of
the final cost including subtotal, tax and shipping costs.
The
ordering process from a customer's point of view:
We will assume that a customer has added all
the products she wishes to buy in the shopping cart and is
ready to complete the order. Pressing the "Checkout"
button in the shopping cart page takes her through to the
following 3 steps that complete an order:
• Step 1: Details :
The customer is asked to fill in the billing (and shipping
if different) details, reply to any check out questions, provide
any additional information, optionally subscribe for the newsletter
and select a payment method.
Once this is done the "Proceed" button takes her
to Step 2.
• Step 2: Confirmation
: The customer is
asked to carefully review the details of her order and click
the "Proceed" button if all appears correct or the
back button to return to the previous page for corrections.
Pressing the "Proceed" button goes on to Step 3.
• Step 3: Payment
: Details of the selected payment method are provided.
If one of the credit card options is selected as a payment
method, the customer is automatically transferred to the respective
service provider in order to complete this step. All ecommerce
transactions take place on the bank servers used by the service
providers and we/you do not keep any credit card numbers or
private information about customers.
Once the order is completed, an email is sent
to the customer and the merchant, informing them about the
details of the order: products, quantity, price, billing/shipping
details and any additional information. The merchant's email(s)
used is the one(s) defined in the "Sales email"
text box found in the "Setup > General" tab.
! Your customers
can register as members to your e-store, simply by providing
their email address. A password is then sent to their email
account, which they can use to login to your e-store at any
time. When members login, they can view all past orders, any
items they have added in their wishlist and they can edit
their account details at any time. This can be done using
the "Order tracking", "Wish List" and
"My account" links found at the upper part of your
e-store pages:

| Figure:
Customers can login to your e-store, and track their orders,
view their wishlist and edit their account details at
any time. |
Summary:
 To receive and manage
your incoming orders go to the Orders menu by clicking the
"Orders" tab in the Administration Panel. To receive and manage
your incoming orders go to the Orders menu by clicking the
"Orders" tab in the Administration Panel.
Click "Orders >
View" in the Administration panel to see a list of all
your "Orders".
Click "Orders >
Export" to receive a .txt file of all your orders via
e-mail.
Use the Search panel to
locate specific Orders.
All new, existing and
past orders are listed under the "Orders List".
View "Detailed Order
Information" by clicking on the "Customer Name"
or "Edit" link in the "Orders List".
Change the status of an
order and view customer, shipping, product and pricing information
through the "Detailed Order Information" page.
Customers can login and
see past orders, view any items in their wish list and edit
their account details.
Customers have to go through
the following last 3 steps to complete an order: provide their
details, confirm the details and proceed to the payment.
When an order is placed
an email is sent to the customer and the merchant. The merchant's
email(s) used is the one(s) defined in the "Setup >
General > Sales email" text box.
|