Category
Setup
The Magnet Commerce category editor:
After collecting your products' info and photos
you should organize them in categories. The better you organize
them the easier your visitors will navigate your store.
In order to do so, go to the Category Editor
page by clicking "Catalog > Categories".

| Figure:
Setup a category by choosing "Catalog > Categories"
in the Administration Panel. |
You can use this page either to edit an existing
category or to create a new root category (a category with
no parent).
For adding a new root category, type its name
in the text box and click "Add Category". If you
had wanted to edit an existing category you would simply choose
the category from the "Edit Category" drop down
menu.

| Figure:
Adding the root category "Digital Photography".
|
You are now transferred to the category editor
page for the "Digital Photography" root category.
Here you can define the category's details and add images
and subcategories to it.
Edit a category:
A form for editing the category's details (parent
category, title, description etc.) is provided at the top
of the category editor page.
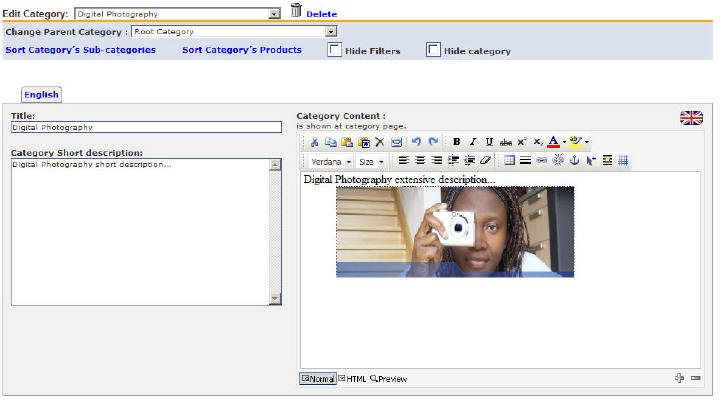
| Figure:
Editing the "Digital Photography" category. |
Delete: The
option of deleting the category is given by pressing the "Delete"
link.
Change Parent Directory:
You can also change the parent directory by choosing a different
one from the "Change Parent Category " drop menu.
This of course applies to the case where the category you
are editing is a sub-category.
Sort Category's Sub-categories:
It is possible to change the order of the category's sub-categories
by clicking on the "Sort Category's Sub-categories"
link. A pop up window will appear with the existing sub categories
and you can easily sort them using the arrows provided:

| Figure:
Changing the order of the sub-categories found in the
Digital Photography category. |
Sort Category's Products: Similarly
you can change the order of the category's products by clicking
on the "Sort Category's Products" link. Remember
that a category will have products only if it is a final category
(contains no sub-categories). Assuming that we were editing
the Tripods final category, clicking the previous link would
show the "Order Products" pop up window where the
products can be sorted using the arrows in the "Sort"
list:
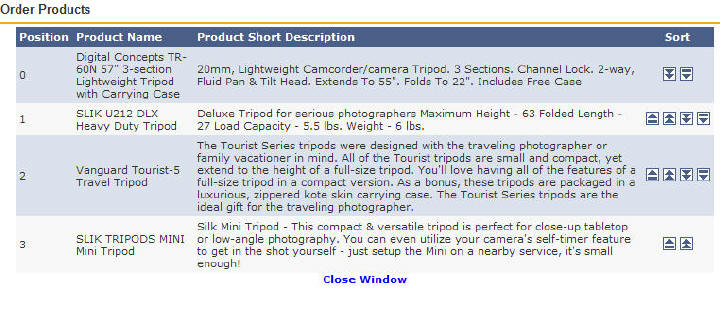
| Figure:
Changing the order of the products found in the "Digital
Photography>>>Tripods" final category. |
Hide Filters:
You can choose to hide the filters assigned to a category.
This way the filters will not be available on the category
page but the same filters will still be available on other
categories. For example you may wish to hide the filters from
the "Digital Photography" category page:

| Figure:
Storefront: Hiding the filters from the "Digital
Photography" category page. |
But show them in the "Digital Photography>Digital
cameras" subcategory:
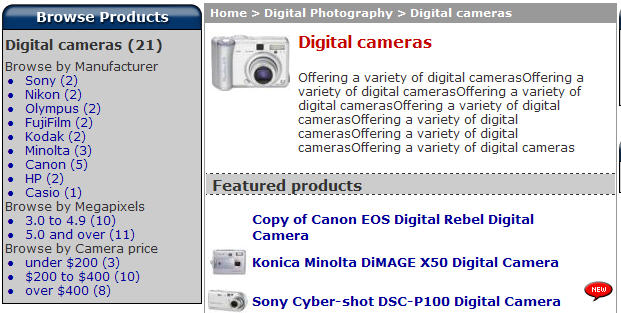
| Figure:
Storefront: Keeping the filters in the "Digital Photography>Digital
Cameras" subcategory page. |
Hide Category:
You can choose to hide the category if you wish to keep it
unavailable for a length of time.
Title: Add the category
title.
Category Content: Add
the category content that will appear in the category's main
page. The category content editor has all major functionalities
of a powerful text editor and will let you paste files, process
the text etc.
Category Short description:
Add a short description for the category. This will
appear in category listing pages.
Add a category image:
Use this form to upload an image for the category.

| Figure:
Adding a picture for the "Digital Photography"
category. |
Type the image pathname or use the "Browse..."
button to upload the image for your category. Once the image
is uploaded, it will show up in the "thumbnail photo"
section.
If you wish to change the image used for a category,
click on the "Update Image" button to delete the
existing image and upload a new one using the "Browse..."
button.
Save & view the new category:
Once all the fields have been edited accordingly,
click on the "Update Category" button to add the
changes to your store front.
Having updated the current category with the
previous settings, the category's storefront page will look
as follows:
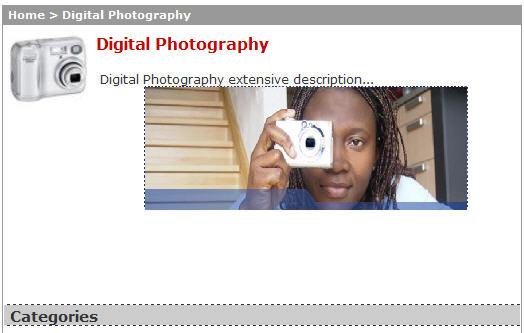
| Figure:
Storefront page of the "Digital Photography"
category. |
Add a subcategory:
Finally an optional form for adding a subcategory
to the current category is provided at the bottom of the category
editor page:

| Figure:
Adding the "cini cameras" sub category to the
"Digital Photography" category. |
Simply type the "Subcategory Title" in the text
box provided and use the "Add Category" button to
add the defined subcategory.
Summary:
 Choose "Setup >
Categories" in the administration panel to create a new
root category or edit an existing one. Choose "Setup >
Categories" in the administration panel to create a new
root category or edit an existing one.
Once in the category edition
page, you can add a title, long and short description for
your category, change the parent directory and the order of
the sub-categories and products listed under the category,
add an image and sub-categories etc.
There is always the option
of deleting the current category by use of the "Delete"
button.
Once all the changes are
done click the "Update Category" button to update
the category in the e-commerce storefront.
|