|
With a Magnet Commerce subscription you
can have e-mail addresses for you and every member of your
team.
Once your store goes live you need to let us know of the email
accounts you want.
For example if your store was:
www.my-store.com
you could setup the following email accounts for your customers
to contact you:
[email protected], [email protected] etc.
or the following email accounts for your store's team members:
[email protected], [email protected], [email protected]
etc.
You can also define the passwords you want for each account
or we can set the passwords for you.
! Any
of the email accounts you create can be forwarding accounts.
For example, if there are two members in your sales team with
accounts: [email protected] and [email protected],
the account [email protected] can get forwarded to
those two emails. This way, when an email is sent to [email protected],
both of your sales partners will receive it.
To let us know which email accounts you want to use, please
contact
us.
We will inform you when the accounts are ready, so you can
set them up on your preferred email client (Microsoft Outlook,
Outlook Express, Mozilla Thunderbird etc.). Following is an
example of how you can set up an email account. In this example,
the email client we will use for setting up the account is
Outlook Express.
Step
#1
Make sure you have first downloaded
and installed your email client (in our case Outlook Express)
before proceeding.
Once you have downloaded and installed
your email client (Outlook Express), open the application.
When the application is open and running, go to "Tools",
then select "Email Accounts" from the pull-down
menu. You should now see a pop-up window labelled "Email
Accounts".
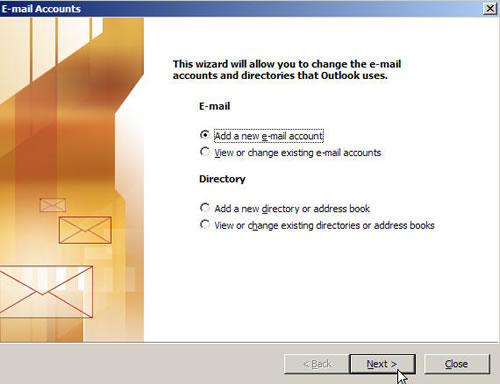
From the pop-up window, select
"Add a new email account",
and click "Next". "Next".
Step #2
You should now see a pop-up window
on which you need to choose the server type for your account.
Select the POP3 email server
for downloading your email and click "Next".

Step
#3
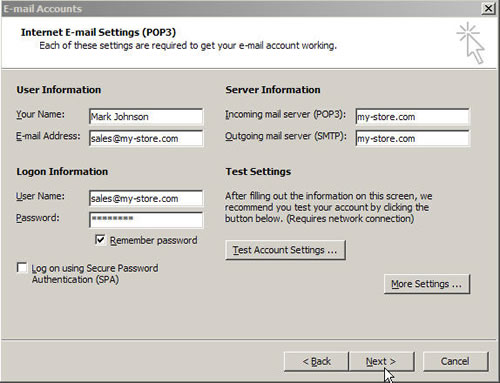
The next pop-up window will
ask for your email account information. You need to provide:
- A name for
your account. This name will show up on all
mail sent from the e-mail address you are setting-up.
- Your E-mail Address.
This is the e-mail address you are setting-up, for example
[email protected]
- Your login for this
POP3 account, which is your email address
- Your password. If you
wish, Outlook Express will save your password so you don't
have to enter it each time. Make sure the "Remember Password"
box is checked if you wish to store your password. Do NOT
check "Log on using Secure Password Authentication (SPA)".
- Your Incoming and Outgoing
E-mail Servers. These are you domain name, for
example www.my-store.com.
 |
Note that
you can also use your ISP (your Internet Service Provider,
the company that provides your Internet connection) for
your outgoing mail server (SMTP). If you do this, the
process of sending your emails will be faster. |
When you have filled out this information click "Next".
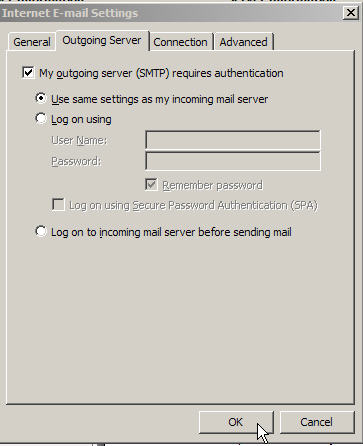
! If you have
set your SMTP server to your store's domain name (and not
your ISP), you need to enable SMTP server authentication:
Click on "More Settings", select the "Outgoing
Server" tab from the pop up window and check the box
that says "My Outgoing Server (SMTP) Requires Authentication".
Once you have checked the box click "OK" to save
and close.
Step
#4
You have just completed setting up this
account in Outlook Express, and should see the screen shot
below! Be sure to click on the "Finish" button on
the bottom.
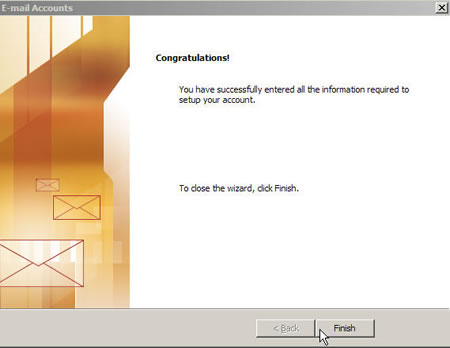
When you have finished all 4 steps, send
a few emails to and from the account you have created, to
check that everything works as expected.
|